Saturday, January 29, 2011

Snow, birthdays and catching up

Whew this has been a busy few weeks! Did you think I had disappeared? I didn't! But I did get some things done to share with you.

We had a couple of huge snowstorms here in the Midwest, but it's almost all melted now. Thank goodness, because I do NOT do snow. I'm infamous for never wearing proper winter gear. The day after our snowstorm, there was a little over a foot on the ground. I went out in leggings, a dress, my coat, two hats, knit boots and my "snow socks"...purple striped knee-high socks. Apparently this was not "appropriate" for snow weather, as I soon found when trying to dig my car out of the snow. This was the view during the first snowstorm...a mere 5 inches, before the horrifying 7 inches fell on top of it a few days later.


You can't tell in that photo, but it was snowing so hard! Really coming down. Tabitha was very interested, so I opened the door to let her explore.


She sniffed around and stuck her paws in it for a few minutes. She was too scared to venture out from the edge though. Eventually she bolted in and burrowed under the covers. She learned that move from me!


I also started class this week (icky) and celebrated my youngest brother's and B's birthdays, which are a mere five days apart. B and I went to have crab, his very favorite. I won't disgust you with the amount of crab legs he ate. I'm a vegetarian---have I mentioned that before? Meat-free for 10 years and counting---so I didn't partake in the crab feast. Eventually, I started cracking the crab legs for him just so I could have a hope of leaving the restaurant at some point. 

I've been sick too. I was in a Nyquil coma for over 12 hours, and I've been laying in bed watching Absolutely Fabulous on DVD. Have you seen it?


It's hilarious! B and I have been watching lots of British television, because we are going to London and Ireland at the end of May. It's our first time out of the country, and we're very excited. I'm hoping we can pick up some British slang so we don't stick out like tourists...but what will probably happen is I will try to say "Cheerio! Bloody cold out here innit?" in a Kansas accent and people will laugh in our faces.

So anyway...that's what's happening with me! I have lots of projects that I've finished/working on, and I'll be back to post about them. In the mean time...here's a sneak peek:


Doesn't it look fabulous? Aren't you excited?! I can't wait to show you!

Thursday, January 13, 2011

Ribbon Wreath

I love ribbon wreaths! They are sooo easy to make. Seriously. It's a snap. And even better...super cheap! Especially if you get ribbon when it's 50% off at HobLob, which it practically always is.

I previously had a houndstooth ribbon wreath hanging up, but I got sick of seeing it every day. It was perfectly nice, but I wanted something with a little more punch. So off to the ribbon aisle I went, and I spent about an hour or twenty trying to decide between the ribbons I liked (every single roll they had). There is no need for a tutorial on this...it's THAT easy...but I went ahead and wrote one out anyway. :)

Ribbon Wreath Tutorial


Supplies:
Polka dot ribbon: $3.99+50% off=$2 x 2 rolls=$4
Pink ribbon: $1.99+50% off= $1
Straw wreath: $3.00+50% off= $1.50
Hot glue and hot glue gun: on hand
Total cost: $6.50

First fold over the ribbon to give a nice clean edge. Secure with a dab of hot glue. Ignore my lack of a manicure please!!


Glue the edge down on the inside or back of the wreath. I leave the plastic on because it helps keep the straw from poking out. Start wrapping the ribbon around, slightly overlapping the last wrap. Secure with a blob of glue every few wraps.


This is where one roll got me to. To start the next one, you can either start on the back/inside and double back (to hide the seam)....oooorrr if you're like me, and frankly could care less about crap like that, just start right where you finished.


Just like at the beginning, fold over the edge and secure with a dab of glue. Keep wrapping until you get the entire wreath covered. Fold over the edge of the ribbon and glue again. Glue the edge to the inside or back of the wreath.


Next, I added a bow at the top. You could do this lots of different ways. Sometimes I wrap the ribbon around several times to get a thick band. You could also leave a loop so that you could hang it from that. I just shove the wreath itself onto the hook; otherwise it obscures our peephole. For this wreath, I wrapped it once, tied it in a knot, and tied a big bow. Then, for a little extra sparkle power, I glued a little diamond plastic gem at the top. Sidenote: are there people that are rich enough to decorate wreaths with actual gemstones? Probably, but I guess it's doubtful they'd be making their own wreaths. Anyway...


At this point, I had planned to stop with the wreath, but I still had a little bit of ribbon left over. I decided to make a flower to put on the corner. I ran a quick, wide stitch through the edge of the ribbon, gathered it as tight as I could, and sewed the edges together. Instant flower!


I did the same thing with the pink ribbon, except I didn't pull it into a circle. I pulled it tight enough to ruffle a little, then I glued it onto a scrap of fabric that I had cut to be slightly larger than the above flower.


Glue the flower to the middle of the circle of fabric. Adorn with a crazy amount of crystal-y things. Place the flower on the wreath and secure with hot glue (and lots of it).


And you're done! I love it. Perhaps a bit bright for January in the midwest, but so what? Who cares?


If anyone asks, it's a Valentine's day wreath...despite the fact that it's a month til the holiday and I plan to keep it up long after. :)


If you made it all the way through that boring tutorial, congratulations! Your reward is some bonus craft photos.

First up...an apron I've been working on for my friend for a few weeks. It's my first attempt at an apron and it was made sans sewing machine. It is cobbled together with hand stitching, hot glue and Stitch WitcheryDefinitely not perfect, but I really liked it. It's bright and cheerful...perhaps a bit too busy, but I like that about it! The flowers were made with the same technique as above...super easy and quick!


Next, I made this wreath of pages from Shakespeare plays for my the classroom of my friend, who is a high school English teacher, using this tutorial. I love how it turned out, but it was soooo time consuming!! For each rosette, you have to cut out a square, then cut it into a spiral, then roll it, then cover it in hot glue. I made at least 200 rosettes. It took hours and hours, and my fingers were covered in hot glue burns! It was cheap though, I must admit...a package of glue gun sticks ($4) and a straw wreath ($2). The books I had on hand. I had planned to make one for myself, but I'm going to wait until my fingertips heal.


Bonus photo of Tabitha photobombing my shot:


Try your hand at the ribbon wreath...even if you're not a crafter, I promise it is SO easy! And show me what you got, I want to see your take!

I'm linking this post up to the Shabby Nest Frugal Friday linky party and the 30 Handmade Days Pity Party!


XOXO darlings,
Cassie

Wednesday, January 12, 2011

New bedspread!

As I've mentioned, I'm in the middle of renovating our bedroom. I've bought several things already, but I haven't managed to put it all together yet. I'll wait to show you the rest, but I couldn't wait to introduce the quilt!

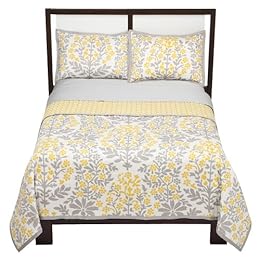
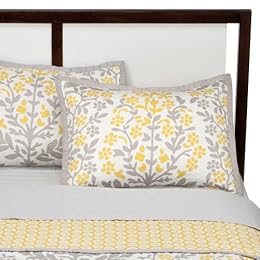
It's from the Dwell Studio for Target line. If you haven't heard of Dwell Studio, it's a swanky design company that makes great modern furniture and bedding. I love their bedding, but it's way too upscale for my budget. The Dwell Studio for Target line is much more affordable. I fell in love with one of their quilts, but at $80 for the king size (we have a queen bed but I think it always looks better with size-up bedding), I thought I could do a little cheaper. So B and I went on a whirlwind shopping trip, looking at bedding at 10 different stores. I did find some better deals, including a white quilt that had quilted polka dots for only $40 at TJ Maxx.

I also found this yellow and blue quilt at Kohls. I liked that it would match both our blue sheets and our white sheets. But the little flowers were a little too twee for me, and I felt like it wasn't really my style.


I completely fell in love with this quilt from Kohls, but it didn't have the yellow accents I wanted. I love the bright colors and the fact that it's reversible though.


But in the back of my mind, I was still in love with that Dwell Studio quilt!

Isn't it gorgeous?! I love the color palette and the design. It's thin enough that it could be used all year long. Plus it's reversible! Two quilts for the price of one! When B and I finally made it to Target, I showed it to him, fully expecting this conversation:

Me: Look, isn't this pretty?
B: It's okay. How much is it?
Me: Weeeellllll...it's eighty dollars. But look! So pretty!
B: Eighty dollars? Are you nuts?! I like the other one.
Me: Which other one?
B: The cheap one.

But actually, this is the conversation that happened:

Me: Look, isn't this pretty?
B: Hey...I like this! This is nice! It's really really soft.
Me: Don't you want to know how much it is?
B: (suspicious look in his eye) Why? How much is it?
Me: Umm. Eighty.
B: Oh really? Hmm, it's worth it.
Me: *falls down on floor in shock* then immediately *jumps up and down with joy*


Would I have bought it with or without his approval? Probably. But it's nice to know he's on board. :)

Now comes the hard part....choosing the fabric for our soon-to-be-created upholstered headboard. I want it to be a print as well, match this comforter, and still be neutral enough to match other bedding in the future. Here are a few mock-ups out of the many many many that I've tried.

My favorite is the one at the top with the star next to it. Go ahead and scroll back up to look at it. I'll wait here. Hmm hm hm hm hmmm hm hm (that's the Jeopardy theme song, FYI). So if that's my stand-out favorite, why the strife? Well, there is no Jo-Ann's in my city. The nearest one (about 25 miles) doesn't have it in stock. Neither do the other 2 closest ones. The only one that does is 45 miles away, and they only have 2 yards. I need at least 2.5, maybe even 3. I'm going to go to Hobby Lobby tonight to see if they have anything good, which is doubtful. Though I love HobLob, I always find their fabric selection to be a little lacking. Wish me luck! I'll update with my progress.

XOXO darlings,
Cassie

Tuesday, January 11, 2011

A Few of My Favorite Things

OK, so the title is one of the oldest clichés in the book (well, Sound of Music was made in 1965, so probably not, but you get my drift). But today I'm going to introduce you to some of my favorite items in my home. For a teeny tiny apartment, I have a lot of favorites...so I'm going to limit myself to just ten. Here are my top ten favorite decor items, in no particular order.

1. Globe lamp

I know it doesn't look so great in that photo, but it looks awesome lit up:


I've wanted a globe lamp since I first saw While You Were Sleeping with my mom when I was younger (which is a great romantic comedy, if you haven't seen it). Here's a screenshot of little Lucy's globe lamp she inherits from her father:

The line that goes along with this scene is "'Lucy, your mother gave me a special gift. She gave me the world.' Actually, it was a globe with a light in it. But for the romantic that he was, it may as well have been the world." Aww. Unfortutantely, my acquisition of the globe lamp is less sweet and more crazy. It involves me at the Goodwill, seeing the lamp across the store, running to snatch it up and dancing around with glee. I think I spent $12 on it. Truthfully, I probably would have paid $50, since I've seen them on Ebay for $100 and up (yikes!). 

2. Milk glass collection

If you don't know what milk glass is, you can read the Wikipedia article here. The first piece in my collection was the vase on the far left. It was my great-grandmother's, and I snatched it when my grandma was going to throw it out. Next, I found the bowl at a thrift store and bought it to match. Next thing you know, I had a collection going! I don't fool myself into thinking it's worth anything; I know these aren't precious antiques! I think they're pretty, especially the hobnail.

3. Jewelry cabinet 


I bought this at a thrift store---me? thrift store? You're shocked, I know---for less than $10. When I bought it, it was gold with black glaze and the inside was very old faux velvet that was falling apart. Ew, right? I spray painted it a metallic silver and recovered the inside with a red damask print. I know there are plenty of people that would have taken this a more sophisticated route and painted it a more muted color. What can I say, I love shiny things!

4. Silver elephant

More shiny silver! This elephant was actually what got me started on the metallic silver kick that I'm currently on. He's from a thrift store (of course). I think it's quirky, which is one of my favorite types of design items. Sometimes I like decorating with "classic" or "trendy" things that everyone has, but it's fun to mix it up with something quirky like this or a gold scarab beetle jewelry box (yes I have one and yes I love it!).

5. Ceramic lamps


I bought two of these bases at the thrift store (do you see a theme here?) for practically nothing. They have old wiring, but I don't turn them on too often so it's not a problem. I love love love the bases of these lamps, though I borderline hate the shades. They were super cheap ones that I bought at Target, and I got black because our walls are white. I'm on the lookout to replace them now....I'm thinking a black-and-white patterned shade would be fun.

6. Artwork


One of the best things about thrifting is that you can find great original art for practically nothing. I have 3 paintings in my house that I love love love, and I paid less than $10 for each of them! Since I bought all of them unframed, I like to think the artist discarded them as not quite good enough, enabling me to scoop them up for a song. I wish that I could let these artists know how much I enjoy their work.

7. Vinyl chandelier


Vinyl wall art is a great way to decorate in an apartment, since it peels off easily. In these pictures, the light is reflecting off the vinyl and you can see the white spaces in between. In person, it looks much better; I think it looks painted on even! This picture was taken before I made the chalkboard and replaced the hanging letters with it. I love the chalkboard hanging up so much more! The chalkboard is probably an honorable mention for my top 10 favorites. 

8. Wall of books

I'm a book collector (some would say hoarder). I love to read, and I've been a frequent library patron since I was 3 months old and my mom carted me there in a carseat. As a child, I wanted to live in a library when I grew up. Once I got old enough to realize that would probably (hey a girl can dream) never happen, I wanted to create a library of my own. Being surrounded by books may make some people feel claustrophobic, but it makes me feel comfortable and peaceful. This is just one of our book shelves, but it's definitely the biggest. It's right next to our bed. I would love to have walled the entire apartment in them....okay maybe that's a bit much, but at least put them up on another wall. They were really expensive for me though--$200 total--so this is it for now. I felt these shelves were the best option for an apartment because they're narrow, so they don't take up much space; they are a huge statement piece, which is hard to achieve in an apartment; and they will be easy to take down and move when that happens.

9. Wooden candelabra

This candelabra was a really really dark wood. I painted it metallic silver and rested it on one of my milk glass plates. It sits on our teeny tiny dining room (if you can call a tiny nook right off the kitchen that) table. Do I have too much metallic silver crap? Probably! But I love it so. :)

10. Photo Collection

This collection of photos is over the sofa in our living room. I spray painted the frames black, red and silver to go with the rest of the room. They were all just mismatched thrifted frames that I paid a dollar or two for at one time or another. I love seeing some of my favorite photos---and some of my favorite people!---every day. In our old apartment, which had more windows, all the frames were black and in a border at the top of the wall around the entire living space. Here we have too many large blank walls, and it didn't look as good. 

If you can't see in the photo above, those are the lyrics to Bob Dylan's song "Forever Young." I typed them up, putting my favorite lines in red.


So now that you've been introduced to my favorite things, I hope you feel like you know me a little bit better. I still plan to do a tour of our apartment, but it has to be clean first! Since that only happens about once a week month year, it may be awhile!

XOXO darlings,
Cassie